Turing Prep Chapter 2: Run your first tests (and make them pass)
Article Table of Contents
- Seven steps to your first completed
ruby-exerciselesson: - What next?
Preparing for Turing Series Index #
What follows is an eight-part series that will help you pick up useful information about a number of topics related to Ruby, specifically geared for students learning the Ruby programming language, as part of the Turing School’s Backend Software Development Program
It’s generally intended that you progress sequentially, but there’s no “right way” or “right order” to encounter these topics. You could convince me I have the order exactly backwards. I’d disagree, but only slightly.
I encourage you to skim around these chapters, get the “shape” of what’s to come, in your mind, and then dive in wherever you want. Good luck, and bug reports are welcome.
- Chapter 1: Make Mod 1 Easier Than It Otherwise Would Be
- Chapter 2: Your first passing tests! you are here
- Chapter 3: Objects in Ruby and Mythical Creatures:
unicorn.rb,dragon.rb, andhobbit.rb - Chapter 4: Arrays, Hashes, and Nested Collections
- Chapter 5: Refactoring common errors - in
wizard.rb - Chapter 6: Refactoring practice - Getting rid of
attr_accessorsinogre.rb - Chapter 7: Building out the
medusamythical creature - Chapter 8: Refactoring the
medusamythical creature - Appendix: Troubleshooting Errors
A warning - the hours ahead that you spend on this will be chock full of error messages. Embrace googling error messages! When in doubt, google it, even if it’s meaningless to you! Somewhere on the internet exists hints and clues about what to do.
This skill set (googling for hints, using those hints to improve your googling, testing those assumptions, not giving up, etc) is known as technical sophistication.
Every time you encounter something unfamiliar, and google your way to an understanding and/or solution, you’re building technical sophistication:
In technology, a similar skill (or, more accurately, set of skills) [as mathematical maturity] exists in the form of technical sophistication. In addition to “hard skills” like familiarity with text editors and the Unix command line, technical sophistication includes “soft skills” like looking for promising menu items and knowing the kinds of search terms to drop into Google… along with an attitude of doing what it takes to make the machine do our bidding.
These soft skills, and this attitude, are hard to teach directly, so as you progress through this and subsequent Learn Enough tutorials you should always be on the lookout for opportunities to increase your technical sophistication… Over time, the cumulative effect will be that you’ll have the seemingly magical ability to do everything in every program.
- Michael Hartl, https://www.learnenough.com/command-line-tutorial
Technical sophistication aside, I’ve put together a list of trouble-shooting steps for errors various students have run into, and I’ve helped them resolve. If you hit a problem, check here to see if someone else has seen it too.
Seven steps to your first completed ruby-exercise lesson: #
- figure out how to download the correct repositories
- use your terminal to explore what you’ve downloaded
- open the correct files in Atom
- “run” the files in your terminal and work through the error messages
- learn the basics of Minitest
- get your first passing test in the
strings.rbfile - make the whole file pass!
Throughout this whole process, I hope you maintain a sense of curiosity about the steps involved. You’ll encounter error messages, new terminology, shortcuts for moving around your terminal, and lots of new information around Ruby and testing and such. If you have not read part 1 of this guide, and the two books referenced therein, now would be a great time to do so.
I’ve included a video walkthrough of everything you need to get started:s
1. Clone the repository #
Download the exercises: https://github.com/turingschool/ruby-exercises
Note: “the repository” means “a collection of files and folders on Github.com”. “Cloning it” means “copy those files and folders to your computer”.
To do this, first visit this URL: https://github.com/turingschool/ruby-exercises
Click the Clone or download button:
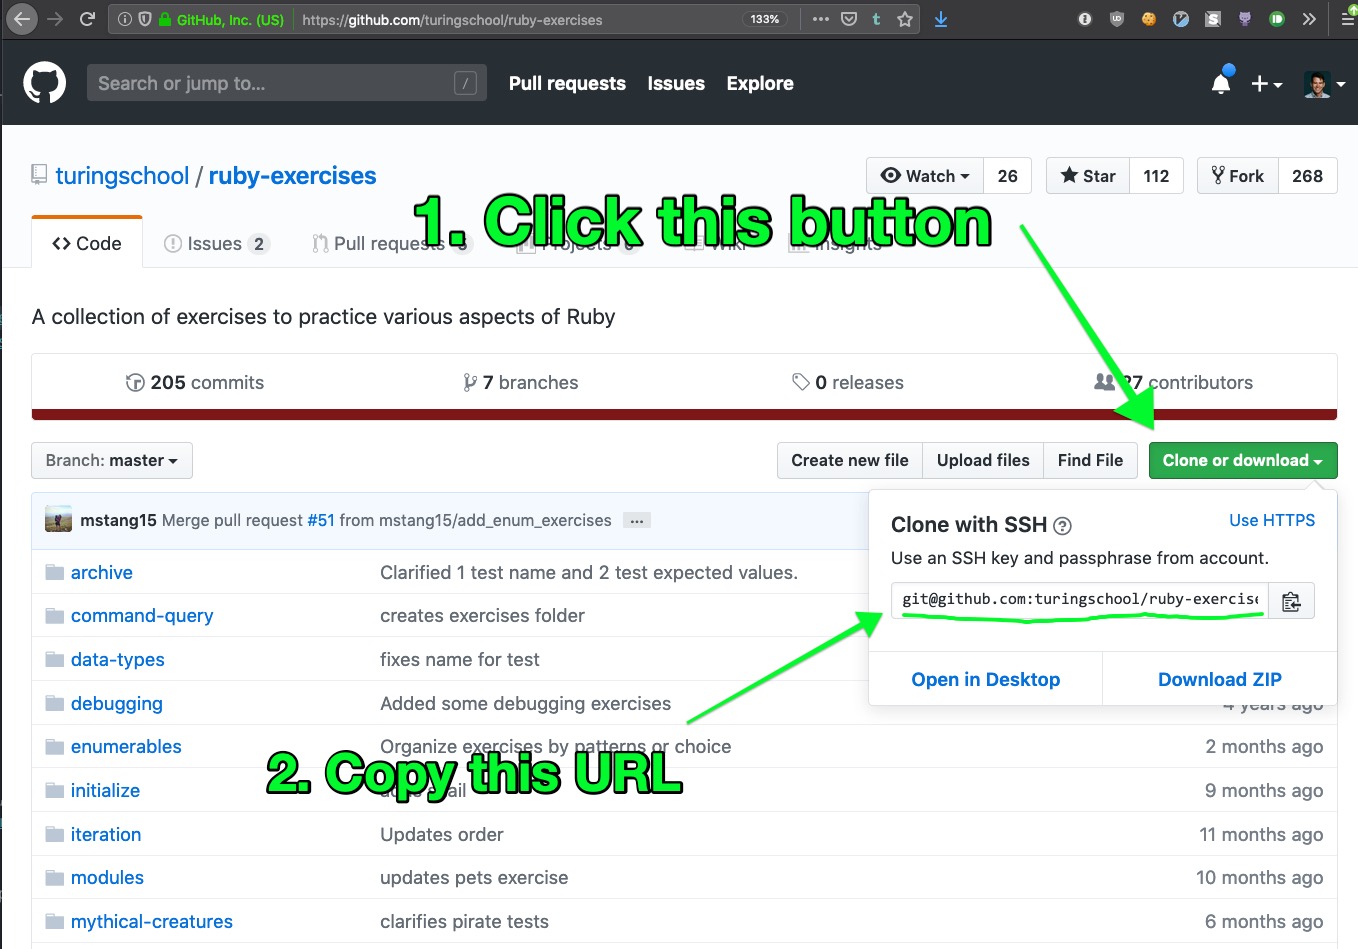
The URL you receive will look like one of these two options:
https://github.com/turingschool/ruby-exercises.gitgit@github.com:turingschool/ruby-exercises.git
It doesn’t matter which one you use. To exercise your technical sophistication muscles, you can read more on the difference between HTTPS and SSH URLs here
Now, in your terminal, navigate to where you want these exercises to be downloaded. You probably have a turing directory in your home folder.
Note: If you’ve not yet watched the video walk-through, I strongly suggest watching it. I used to have a bunch of instructions listed out below, but since writing them out here, I updated them in this authoritive location. I almost deleted the rest of this post in favor of the guide there, but I’m leaving it just in case I find out I need some portion of it later.
Here’s how to find those instructions:
- Head to the ruby exercises URL: https://github.com/turingschool/ruby-exercises
- Scroll down the page and follow the instructions.
When you’re done with setting this up and have your first passing test, jump to the what is minitest? section
Here’s the original instructions:
Since I have a turing directory in my home folder, I would use:
$ cd ~/turing/prework
You might place these files somewhere else. Up to you. Once you’ve cd‘ed into the right directory, clone down the repo. We’ll use the git clone command:
$ git clone https://github.com/turingschool/ruby-exercises.git
or, if you received the SSH url:
$ git clone git@github.com:turingschool/ruby-exercises.git
PS: As a reminder, commands formatted like the above, especially beginning with the $ sign, should be run in your terminal. If you see a // sign, the text that follows it should be treated as a comment. For example:
// lets `cd` to our home directory:
$ cd ~

// now lets look at all of our hidden files using the [a]ll flag:
$ ls -a
2. Use your Terminal to explore what you’ve downloaded #
You should be able to see the cloned directory on your machine. If you run ls in the directory you just ran the git clone command, you should see an entry for ruby-exercises.
now, cd into the ruby-exercises directory:
$ cd ruby-exercises
Lets start with heading into /data-types/strings/:
// first, `cd` into the `data-types` directory
$ cd data-types

// i usually run `ls` just to see what is in each level of a directory.
// I'm a curious person.
$ ls

// now `cd` into the `strings` directory:
$ cd strings

$ ls
When you call ls the last time, you should see README.md and strings.rb.
It will look a bit like this:
$ ls
README.md
strings.rb
If this is what you see, you made it!
If not, cd up a level or two, and look around again. (To change directories up, you can do
$ cd ..
3. Open everything in Atom #
now we’ll open everything in Atom:
$ atom .
Click the README file, and read it.
If you have problems opening atom, read the Troubleshooting Errors: Cannot open atom from the terminal post
4. Run the file in your terminal. Resolve gem-related error messages #
Run the file in your editor with:
$ ruby strings.rb
You might get an error like this. (I’ve highlighted the relevant pieces of the error. The first highlight shows where in the file we ran into the problem, and it’s line 3 of the strings.rb file.
The second highlight says “cannot load such file – pry”.

Now, take a look at line three of strings.rb:
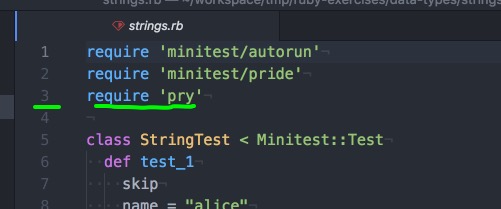
That’s a gem we need.
If you don’t get this error, great! You already have pry on your machine, and you can skip the next section.
What the heck is a “ruby gem” #
A “gem” is just a little bundle of code that interacts with Ruby.
Here’s a rather verbose description of what gems are.
And, since we need to install the pry gem, we can look it up and see what it does. I googled ruby gem pry and clicked the first result, which brought me to: https://github.com/pry/pry
Feel free to read the docs, and get a feel for what Pry can do for you.
Anyway, install the Pry gem with:
$ gem install pry
If you want to see all of the gems installed on your computer already, you can run:
gem list
You can read more about the gem command here
If you get an error like this:
ERROR:  While executing gem ... (Gem::FilePermissionError)
    You don't have write permissions into the usr/lib/ruby/gems/pry directory.
I’ve got trouble-shooting instructions in the troubleshooting guide
5. Learn the basics of Minitest #
See the references to minitest at the top of the file? minitest/autorun and minitest/pride?
These are “modules” of the minitest gem.
I strongly recommend “pausing” this guide and reading (and re-reading, and write all the code from all the examples in) this excellent guide: https://launchschool.com/blog/assert-yourself-an-introduction-to-minitest
I’ll state that again. Read and study the Minitest guide. It is fantastic and will set you up for success for the rest of Turing:
https://launchschool.com/blog/assert-yourself-an-introduction-to-minitest
Did you read the Launch School post? Great! Then most of what is in this file should look a lot more readable to you.
As a quick test, answer the following questions:
- What is minitest?
- what is a Domain-Specific Language (DSL)?
- What does
assert_equalmean? How many arguments does it expect? - Will
assert_equal true, "true"pass? - How do you “run” a test file?
- is a “failing” test a bad thing?
- does minitest run all the tests in order?
- Find a list of minitest assertions (google it!). What’s a cool one you found?
Awesome. If you can answer all of those questions, you’ve got your head wrapped around Minitest. Onward!
6. Run the file again, get a bunch of SSSSSSSSS printed out #
Wahoo! If you see a long string of SSSSSSSSS, you’re doing great.
Here’s what minitest results mean:
Smeans “skip”, and it means we “skipped” the test. (see all the words inside each method, that say “skip”? that’s how we skip that test.)Emeans “error”. the test couldn’t run for some reason.Fmeans “failure”. the test ran, but didn’t pass..means “success”. The test ran, and passed.
7. Make the whole file pass! #
So, lets make the first test pass. Just watch the video where I do the first few tests.
Once you get the hang of it, try pausing the video and keep going on your own. Then unpause the video, compare the results, repeat. (But please do watch the video, at least this little section at 10:55 on using Pry from inside your tests)
What next? #
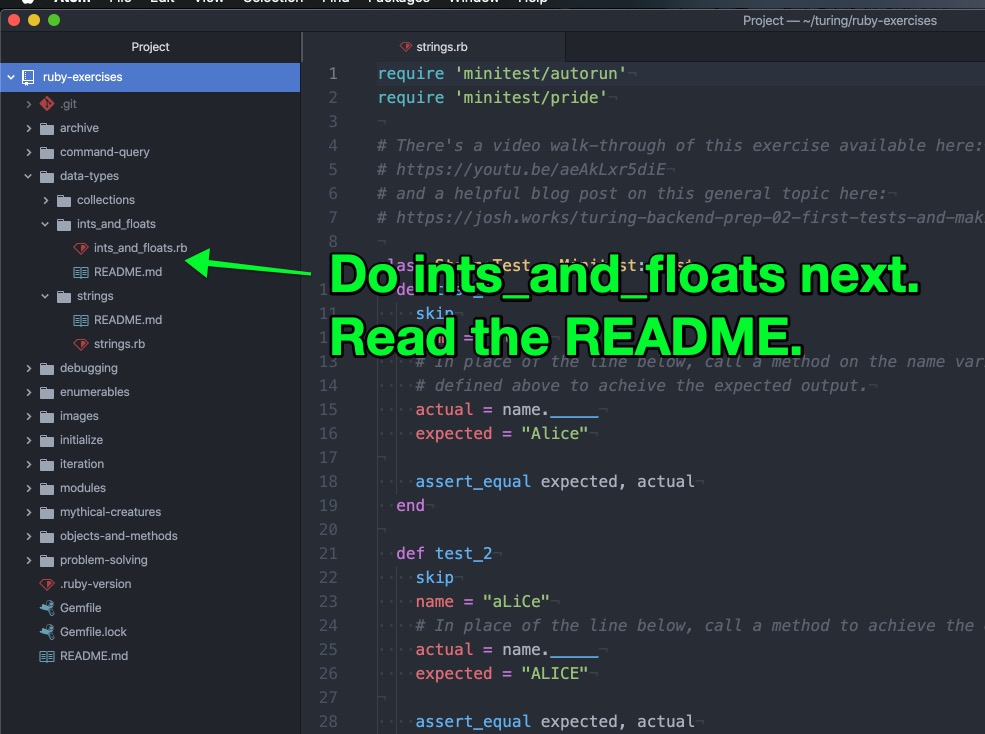
Go ahead and finish this file. When you’re done, do the other test files in that data-types directory.
Please read the README.md associated with every exercise.
These exercises (in order) are:
data-types/strings/strings.rb # you just finished this one
data-types/ints_and_floats.rb # do this next
data-types/collections/arrays.rb # then this
data-types/collections/hashes.rb # then this
data-types/collections/nested-collections.rb  # then this
data-types/advanced_nested_collections/nesting_test.rb # Then this.
Once you start on collections, go read the associated guide I wrote: Arrays, Hashes, and Nested Collections
The chapters are a bit out of order. I’ll fix that soon.
When you’re done, feel free to move to the next chaptter, dealing with objects in Ruby!
Preparing for Turing Series Index #
What follows is an eight-part series that will help you pick up useful information about a number of topics related to Ruby, specifically geared for students learning the Ruby programming language, as part of the Turing School’s Backend Software Development Program
It’s generally intended that you progress sequentially, but there’s no “right way” or “right order” to encounter these topics. You could convince me I have the order exactly backwards. I’d disagree, but only slightly.
I encourage you to skim around these chapters, get the “shape” of what’s to come, in your mind, and then dive in wherever you want. Good luck, and bug reports are welcome.
- Chapter 1: Make Mod 1 Easier Than It Otherwise Would Be
- Chapter 2: Your first passing tests! you are here
- Chapter 3: Objects in Ruby and Mythical Creatures:
unicorn.rb,dragon.rb, andhobbit.rb - Chapter 4: Arrays, Hashes, and Nested Collections
- Chapter 5: Refactoring common errors - in
wizard.rb - Chapter 6: Refactoring practice - Getting rid of
attr_accessorsinogre.rb - Chapter 7: Building out the
medusamythical creature - Chapter 8: Refactoring the
medusamythical creature - Appendix: Troubleshooting Errors