Turing Prep appendix: Troubleshooting Errors
Article Table of Contents
atom .in Terminal doesn’t do anythinggem install pryfailing with “you do not have permission”which rubyreturns/usr/bin/ruby- Add Pry snippet in Atom
FSPathMakeRefand a bunch of other stuffTraceback... cannot load such file -- pry
Pretty much any time I hear the same question twice, I will try to add a section here for it, and make it as findable by future students as possible.
Do you have a question not answered here? PLEASE send me a DM in Slack or @ me (I’m josh_t in the Turing slack). I’ll take a look, make sure you get a solution in place, and then I’ll update this document accordingly.
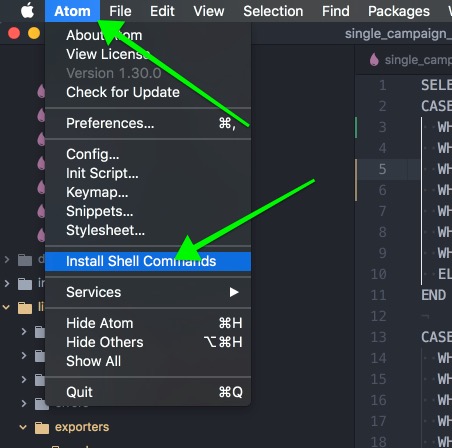
atom . in Terminal doesn’t do anything #
You may need to install the Atom Shell Commands. Atom makes it super easy to do this:
gem install pry failing with “you do not have permission” #
If you get an error like this:
ERROR:  While executing gem ... (Gem::FilePermissionError)
    You don't have write permissions for the /Library/Ruby/Gems/2.3.0 directory.
Don’t worry. We’ll sort you out. It’ll take some work.
First, lets see which installed version of Ruby your computer is trying to use:
$ which ruby
If you get something that looks like this:
# this is broken:
/usr/bin/ruby

# this is working:
/Users/yourusername/.rbenv/shims/ruby
/Users/yourusername/.rvm/rubies/ruby-2.3.3/bin/ruby
If you got /usr/bin/ruby, we’ll need to fix some stuff. Read on!
which ruby returns /usr/bin/ruby #
This means you’re using the version of Ruby that came installed on your laptop, and it’s from like 2013.
You shouldn’t be messing with this version of Ruby, so your system isn’t letting you.
To use Ruby safely, you’ll need to use a tool to manage Ruby’s environment. rbenv is the most common tool for this: https://github.com/rbenv/rbenv rbenv stands for Ruby Environment.
You should have [homebrew](https://brew.sh/) on your computer already. If you don’t, figure out how to install it.
If you have it, here’s a summary of the instructions for MacOS:
$ brew install rbenv
$ rbenv init
After running the second command, you’ll see something in your terminal like:
# Load rbenv automatically by appending
# the following to ~/.zshrc:

eval "$(rbenv init -)"
If we translate this to plain English, it says:
Please modify a configuration file on your laptop to include this line of code at the bottom of it.
To do follow the above instructions, we can run:
echo "eval '$(rbenv init -)'" >> ~/.zshrc && source ~/.zshrc
You should be skeptical of blindly copy-pasting commands from strangers on the internet into your terminal. This command contains three different commands, the echo, append, and source commands. I recommend installing this tldr tool to understand exactly what is happening here.
Now do bundle install or gem install pry again. If it works, success! You’re done!
If that doesn’t work, rbenv might not yet be installed, so lets make sure it’s installed and working correctly. Do:
$ rbenv -v
You should get something like rbenv 1.1.2 back.
Next, tell rbenv to install ruby 2.4.1 (or whatever version of Ruby you want. The current newest stable version of Ruby is up to 2.7.1)
$ rbenv install 2.4.1
And then set this version of ruby as the “global” version to use, until you tell it otherwise or a particular project specifies a different version:
$ rbenv global 2.4.1
You can now do gem install pry, and it will install the gem to the 2.4.1 version of Ruby, as managed by rbenv.
Still having problems?
undefined method pry #
undefined method 'pry' for #Binding:0x0007f8f980d39f8>
When you try to hit a pry in your tests, you might type in something like:
def test_12
  children = ["Sarah", "Owen", "Peter"]

  binding.pry # adding a pry
  one_string = children
  assert_equal "Sarah, Owen, Peter", one_string
end
And then you get an error like:
undefined method 'pry' for #Binding:0x0007f8f980d39f8>
The problem is ruby needs the pry gem to be available in the file where you’re trying to use binding.pry. Here’s how to do this:
Add Pry snippet in Atom #
We’re going to make this happen with four presses, instead of 26.
So you can type pry and hit the tab key, and it’ll auto-expand into the full snippet:
Wahoo!
Also, this line of code is easy to make mistakes with.
I can hardly type require 'pry';binding,pry. I mean require "pry":bindingpry…
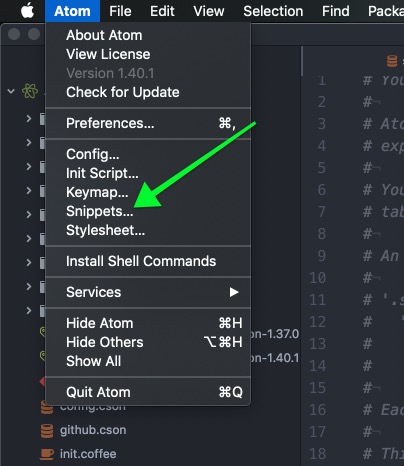
Here’s how to set this shortcut up:
- Go to
Atom > Snippets
- Paste this
prysnippet shortcut into thesnippets.csonfile:
'.source.ruby':
  'require "pry"':
    'prefix': 'pry'
    'body': 'require "pry"; binding.pry'
It should look something like this:
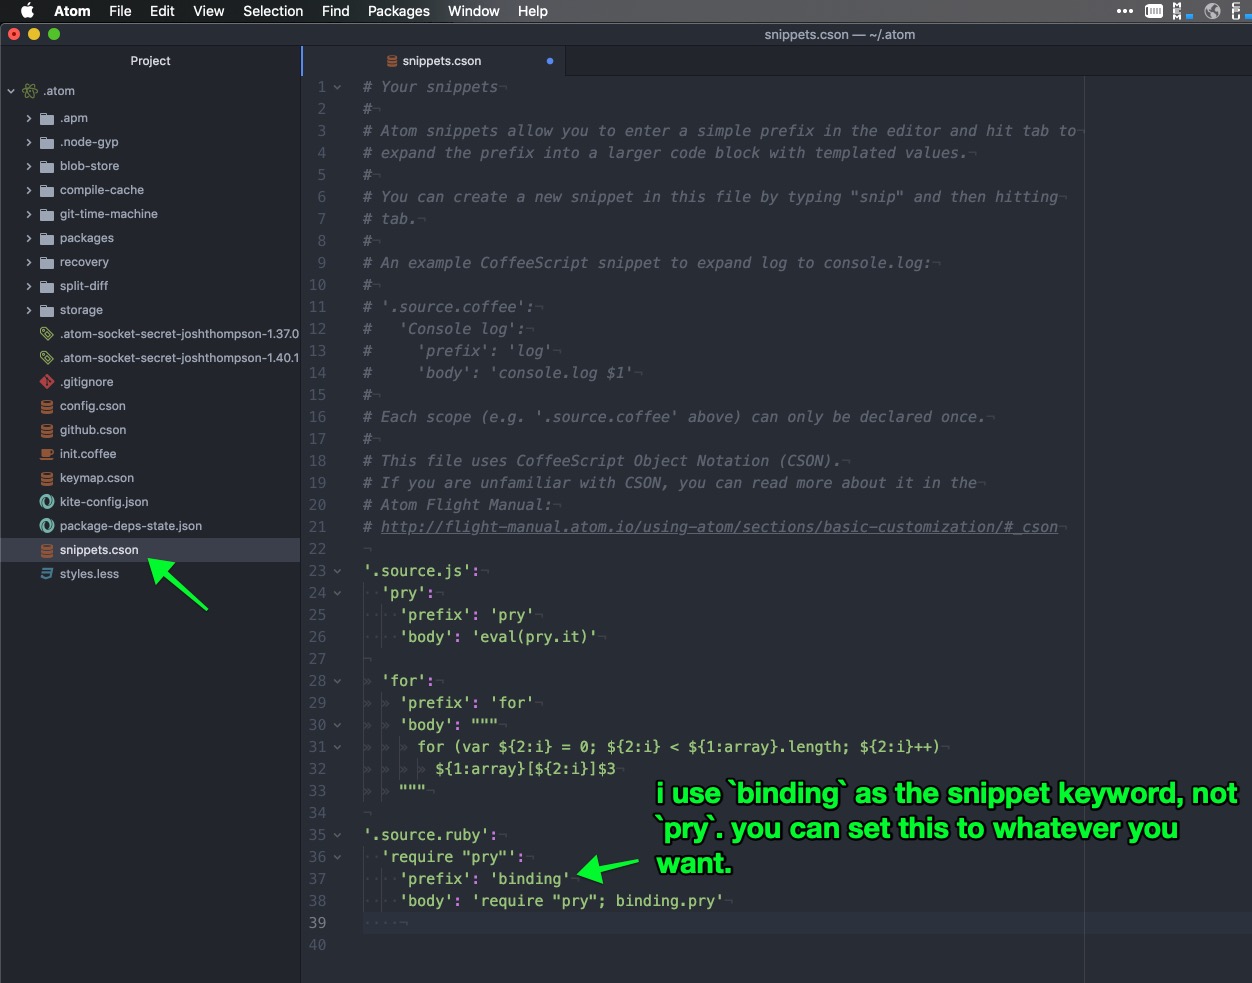
Save and close this file, and go back to your code, type pry, and hit tab. 👍
Want to know more about Atom’s snippets? Heres Atom’s docs on snippets
FSPathMakeRef and a bunch of other stuff #
Here’s an error one student saw:
FSPathMakeRef(/Applications/Atom.app) failed with error -36.
Googling around led here: https://github.com/atom/atom/issues/5222
One possible cause was the user’s machine had two instances of Atom.app on it. In this case, one was in the Downloads folder, the other in Applications. Delete one of them, try again.
Traceback... cannot load such file -- pry #
This seems like an intimidating error message at first.
It’s not. The error just says:
Dear user, you’ve asked me to import code to run these tests, but I cannot find the code you require.
The code I was looking for (and cannot find) is called
pry
Pry is an amazing tool. You’ll soon come to love it. In the mean time, just install it. It’s a ruby “gem” so you use the gem install <gem_name> command.
In your terminal, run gem install pry and then run the tests again.